
I'm quite proud of this one. I have had variations on "little sword" for ages now; I have three little wooden ones floating around that I built sandwich-style from some firewood with a bandsaw, some files, and a lot of sanding, and once I got access to a 3D printer I moved on[1] to working out modular designs--glueless assembled swords that have swapable hilt components (and hopefully blades). I've had a few drafts through the years and one pretty workable sword[2], but the idea's always on the shelf to wiggle with. Like, well. this guy:
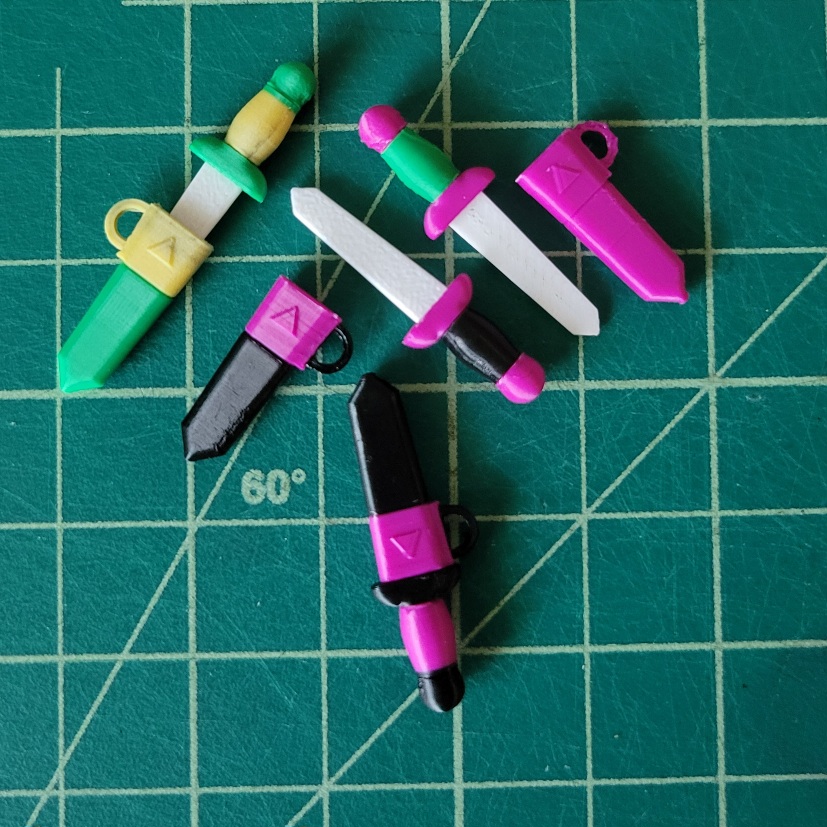
This guy's main schtick is less modularity and more glueless assembly plus "this is literally the absolute smallest sword I can print within the physical constraints of a 0.4mm FDM nozzle". Nothing I have designed has made me reflect upon the fact that a FDM printer cannot print square corners like this one.
Functionally, this fact doesn't even matter at the scale you generally are printing things. Even at this scale, if you're printing a solid object it probably doesn't really matter. But when you're printing pieces to mesh together? Suddenly all the tolerance "rules" you've learned throughout years of designing and months of familiarity with your specific machine go out the window cuz corners are round and you have to increase your tolerances in certain directions to get things to fit in a squircle you're used to calling square because in all other contexts it is a square.
Along with the tolerance (re)learning curve, I also struggled with assembly--I really love glueless assembly, and I wanted to keep the door open re: modularity, so a pure friction fit wasn't an option[3]. My previous plastic swords have accomplished this through threaded tangs and pommels, which is super cool but also not at all an option at this scale. I tried it for funsies and. ahahhaa. There's just not enough room for the smallest feasible threading. The solution (which I was inspired to by a different, prop-sized 3D printed dagger I saw) is a little clip, like so:
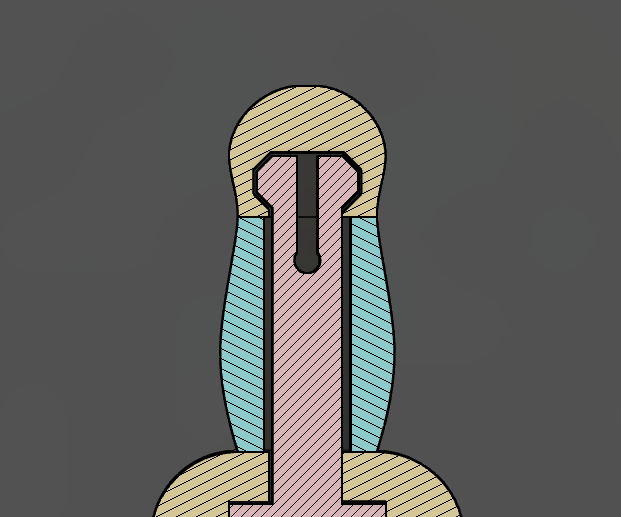
The lumps (when printed, that's all they are, at this scale) can slide through the crossguard and handle's holes, then clip neatly into the pommel's. It's classy and cool and continues to work with only a little added wiggle after you yank the pommel off 100 times in rapid succession. The sword solved, moved on to pulling my hair out for days over the sheath.
Sheaths are easy, honestly. Make a quick shape around the blade, use the blade to cut a hole in it, add in some tolerances so it slides in and out easily, round the outside a little, and you're done.
oh. But wait. You want a little ring on it so this can be a key chain or earring or necklace or armament for a little knit animal? Oh. oh no
Here's the thing. Grain-wise, a sheath is best printed from the hole the sword enters up to the tip that covers the point of the blade. It ensures a good fit and lets you add some surface details or a taper from hole to tip (or even a color change if you want) and makes sure you don't have to worry about bridges on the slot for the blade. It does, however, bring you to the overhang constraint and shear weakness along print layers. The overhang constraint is only a small issue, easily compensated for, but the shear issue? On a loop meant to take strain? at this scale??
it's guaranteed to break.
My solution was to print the ring flat against the bed. Continual loops, with the grain oriented this way, are extremely strong.[4] This solves the overhang problem mostly, ensures the loop will not be the fail point, and makes it look real pretty, too. The uh. Issue is the loop is not attached to the sheath in any way shape or form, and I'm trying to make a glueless assembly. The sheath is not a solid object, but a hollow one that's meant to have something fill it. I thought that even with these constraints I could pull off some sort of clip similar to what I have in the hilt... but. Uh. corners are not square. In order to give the clip enough material to have a large enough hole to fit, the ring mount had to be comically large. I took it to "oof this feels to big" and couldn't get the clip to satisfactorily clip in and gave up. I dropped the clipping bits, made a simple D ring, and it gets superglued into a slot. Now my only enemy is bed adhesion on these teeny pieces.
Aesthetically, I was going for "plastic trinket you get at a arcade in the early aughts". I wanted simple profile, bright colors, and a satisfying action. If these were injection molded I probably would incorporate some more surface detail, but embossing a triangle is about all I think would look great as a FDM object (debossed and embossed images like this just can't get a sharp relief due to the corner rounded issue). I also had a very specific reason for making this at this scale, which is something like 100% smaller than my smallest wooden sword:
I generally put my 3D models out on printables for anyone to enjoy for free, but I'm not sure I want to do that with this one. The effort vs reward is a pretty rough ratio if someone were to try printing these on a creality based off the anecdotes I've read and I refuse to do tech support on my models. It almost feels like something I could drop on ko-fi, but. ime payment makes people feel even more like they should get support. idk, I'll think about it; in the meantime:
I wanna keep a few of these in my backpack to hand out or hide places for people to find. I will absolutely mail you the sword if you're interested and in the continental USA--without a capsule it should be thin enough to mail in a regular envelope with a little cardboard sandwich. I'd also possibly email the .step if you asked
moved on does not in any way mean I'm not gonna make some more wooden ones ↩︎
at this point I kinda feel like the CAD file is less so; I think I built some dependencies in that are less than ideal, but its workflow/history isn't clean enough to quickly suss that out ↩︎
friction fits are either so good you'll never get them apart (these require a good bit of force to assemble, and these are so tiny that high a force is not an option, even in a resilient plastic like PETG) or good enough that you can get them apart and each time to do the friction fit gets a little worse--like a action figure ball joint the loses its grip over time[5] ↩︎
especially at this scale; I'm pretty sure I would tear something before I ripped a ring this size in half; it could deform sooner than that of course, but that's less an issue ↩︎
technically a bad example cuz the other cause for this is a plastic that stretches out from the strain of gripping the ball so it can no longer grip it, which shouldn't be as much a contributing factor here, but. ↩︎